
")
TRICKY STUFF
Task Naming Issues
It is often best in Microsoft Project to make all Task Names unique, so for example when you have a building with many floors and trades each Task Name should include the trade and floor.
❖ This makes it easier to understand the schedule when a filter has been applied and to find predecessors and successors in a large schedule.
❖ In Microsoft Project 2010, 2013 and 2016 this is even more important because the tasks are listed in the predecessor and successor lists in alphabetical order and not the order in the schedule. So if you have 20 Floors with a concrete activity titled “Concrete”, then these activities will be listed all together in a list and it will be difficult to know which floor each concrete task belongs too.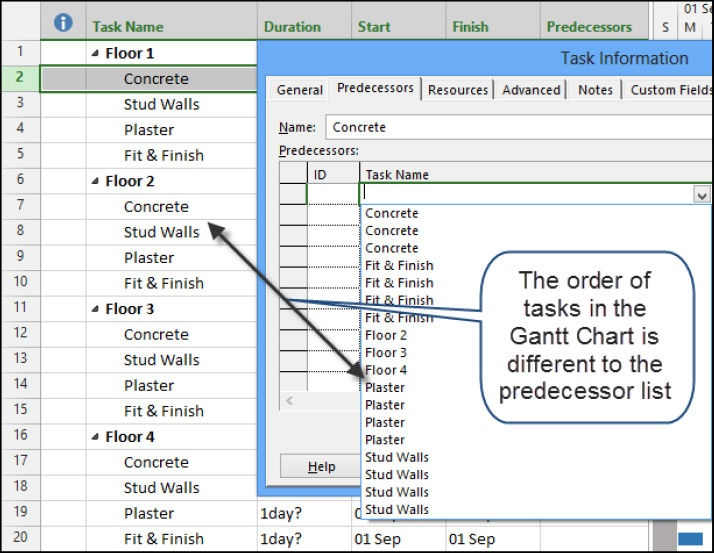
These descriptions may be created in a spreadsheet by using the Concatenate function, the picture below demonstrates how. Text may be added by including it in double quotation marks: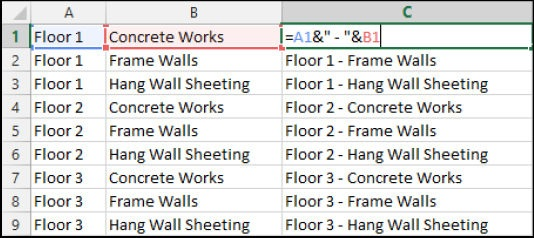
As you can see below the tasks are now listed in “Floor” order in the predecessor list.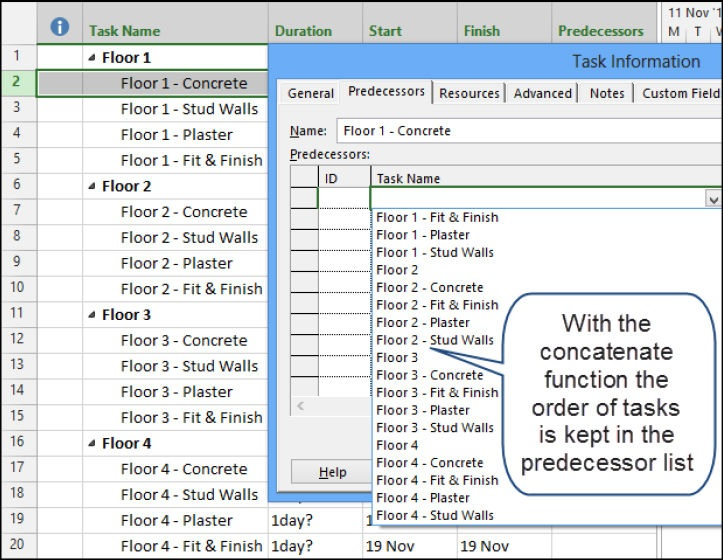
Note: When inserting the Task Name column you will find it is titled Name.
Task Splitting
What is Splitting?
Splitting a task puts one or more breaks in a Task, leaving:
❖ The Duration value unchanged with a Fixed Units task but the elapsed duration is increased,
❖ The Duration value changed with a Fixed Duration task to equal the elapsed duration, and
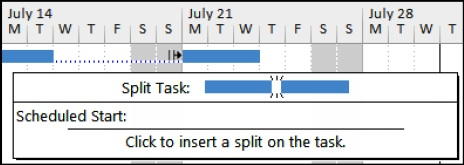
❖ Resources assigned to a split task are not assigned work during the splits:
In the picture above you will see that Work is not scheduled during the split.
Splitting a Task Manually
To split a task manually,
❖ Left-click on the Schedule section, Split Task button located on the TASK toolbar,
❖ The Split Task:![]() box will appear,
box will appear,
❖ Click on the point on the Gant Chart bar where the split is to be made and click.
❖ Then drag the task:
Note: The finish and start dates and times of each split are not available through the user interface.
Splitting In-progress Tasks
When the Split in-progress tasks option is enabled in the FILE, Options, Schedule form, a task will Split automatically when a task commences before its predecessor finishes.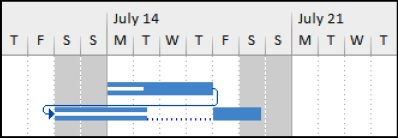
Note: This function is similar to the Primavera Retained Logic function and often produces unwanted Negative Slack.
Removing a Bar Split
A split is removed by:
❖ A manually created split is removed by dragging the split part back with the mouse.
❖ An automatically created split is removed by Turning off Split in-progress tasks in the FILE, Options, Schedule form.
Notes:
❖ You therefore need to pay careful attention to any warning messages Microsoft Project presents, if you have not switched the warning messages off.
❖ Sometimes a tail of dots is left after the split has been removed from a Fixed Duration task. This is the result of a split at the end of a task, this tail has to be dragged back to the finish of the task and then the Duration reset for the task to calculate correctly:
Also you may receive a split at the start of a task when the FILE, Options, Schedule, Split in-progress option is selected and an Actual Start Date is set earlier than the predecessor finish. To prevent this either: ❖ Turn off Automatic scheduling before updating the task, then press F9 to recalculate the schedule or
❖ Set the Actual Duration before entering the Actual Start.
Hiding a Bar Split
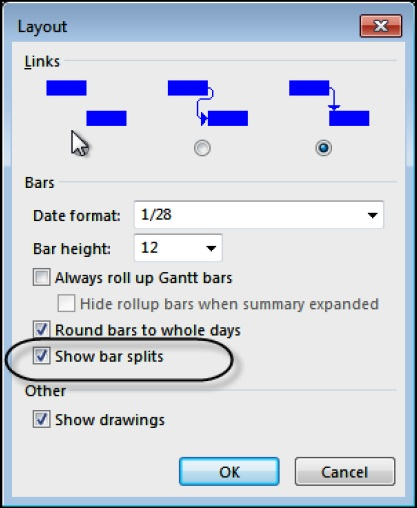
Even though the task has been split, bar splits may be hidden by:
❖ Selecting FORMAT, Format, Layout to open the Layout form and
❖ Uncheck the Show bar splits.
❖ The 10-day Fixed Units activity below has a split with an elapsed duration of 17 days:
❖ The 10-day activity below has a hidden split and an elapsed duration of 17 days, which may be misleading:
Deadline Date
Microsoft Project does not allow setting two task constraints; except in the case of a Deadline Date.
❖ A Deadline Date is set in the Task Information form Advanced tab or in the Deadline Date column.
❖ Deadline Date allows the setting of a date by which a task should be completed.
❖ A Deadline Date is similar to placing a Finish No Later Than constraint and affects the calculation of the Late Finish date and float of the activity.
❖ A constraint such as an Early Start constraint may also be assigned to a task with a Deadline Date.
❖ The Deadline Date may be displayed as a column and appears on the bar chart as a down arrow .
❖ An Indicator icon![]() is placed in the Indicator column when the Deadline Date creates Negative Float (Slack).
is placed in the Indicator column when the Deadline Date creates Negative Float (Slack).
❖ The picture below show how a Deadline Date is displayed, this allows the date to be changed by dragging the icon in the Gant chart.
❖ It also displays how Negative Float is calculated when the Deadline Date is set before the Task Early Finish.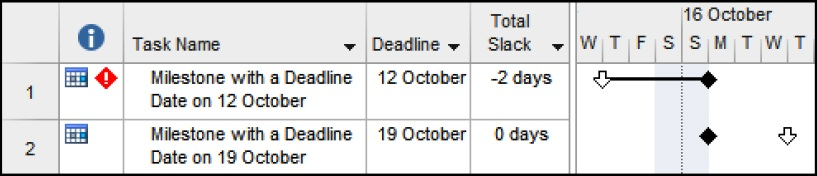
Negative and Free Float Bars
There are some issues with the default Microsoft Project 2016 and 2013 bar formatting:
❖ By default Microsoft project only displays the Free Float Bar with the FORMAT, Bar Styles group, Slack button not the Total Float Bar that would normally be expected.
❖ Also the Negative Float Bar is not automatically displayed by any Microsoft Project function, nor is it included in any standard View. These are two of the most important bars to show when a project finish date has been set using a constraint and these bars must always be manually created.
❖ Negative Float is generated when the Late date is calculated earlier than the Early date and represents the amount of time that the schedule must catch up or how much earlier a project must start to finish on time. Setting a Late constraint or Deadline date earlier than the calculated Early Finish date normally causes Negative Float.
❖ Free Float is the amount of time a task may be delayed without delaying a successor task.
These two bars will have to be added manually using the Bar Style form by:
❖ Selecting FORMAT, Bar Styles, Format drop down box, Bar Styles or double-click anywhere in the Gant Chart area except on an existing bar (this will open the Format Bar form and not the Bar Styles form) to format an individual bar.
❖ Then add the additional bars as indicated below: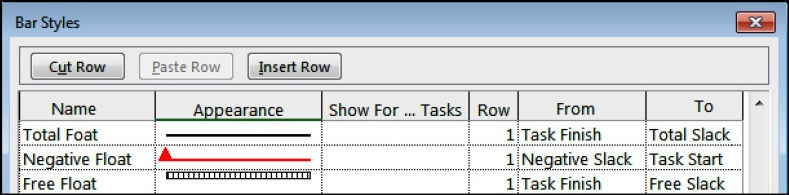
Note: Unlike some other software, the Negative Float is drawn from the Start Date of a task and not the Finish Date. Therefore one bar is required for Negative Float and one for Positive Float. There are some options to permanently resolve this lack of formatting functionality:
❖ You may wish to consider recording a macro to create the bars and this can be run when a Total Float and Negative Float bar is required.
❖ You could create a View with these bars, save your own template with this view and then use the template to create all new projects.
❖ The author has found that these additional bars produce a better presentation and do not interfere with the drawing of relationships when created at the bottom of the list in the Bar Styles form.
❖ You may also download an Eastwood Harris Microsoft Project 2016 and 2013 template project from the Eastwood Harris web site at www.eh.com.au, Software & Downloads page. This has an inbuilt View which displays both the Total and Negative Float bars. Also other issues with Microsoft Project2016 and 2013 have been resolved and are covered in the template description on the web site.
Where is the Gant Chart Wizard?
The Gant Chart Wizard was the main method of formatting the bars in Microsoft Project 2007 and earlier. It is still available in Microsoft Project 2016, 2013 and 2010 and may be accessed by adding![]() icon to the Ribbon or Quick Access toolbar. The Gant Chart Wizard should only be used to format projects created with Microsoft Project 2007 and earlier. If it is used to format projects created with Microsoft Project 2016 or 2013 or 2010 then some strange things happen like the Baseline bars cover up the current schedule Summary bars.
icon to the Ribbon or Quick Access toolbar. The Gant Chart Wizard should only be used to format projects created with Microsoft Project 2007 and earlier. If it is used to format projects created with Microsoft Project 2016 or 2013 or 2010 then some strange things happen like the Baseline bars cover up the current schedule Summary bars.
As Late As Possible Constraint
This constraint must be used with caution as it consumes Total Float (Slack) and therefore delays all successor activities; it does not just delay the task that the constraint is applied to.
❖ All Tasks in the picture below have Total Float:
❖ When Task C is made As Late As Possible then Task B develops Free Float:
❖ When Task C is made As Soon As Possible and Task A is made As Late As Possible then Task A consumes all available Total Float and delays all the successors:
Note: Some software packages offer a Zero Total Float function, which allows activities to be delayed and consume Free Float without delaying any successor activities. A Start to Finish relationship will drag a successor in front of it and act like a Zero Float constraint, but the use of this relationship is usually considered bad practice.


")